OBJECTIVES:
Upon completion of this module topic, you will:
- be able to explain the various types of blotting techniques (Southern, Northern) for detecting specific DNA and RNA fragments using various types of probes for hybridization (DNA fragment probes, oligonucleotides).
- be able to explain the significance behind labeling probes and the methods used to label probes (radioactive isotopes, alkaline phosphatase, antibodies, chemiluminescence probes, fluorescence probes).
- be able to explain methods used to visually detect probes bound to targeted DNA or RNA.
- be able to explain what DNA Microarray Assays are and how they are used to conduct large scale analyses of gene expression.
Part a
Nucleic Acid Labeling
This is Part A, Nucleic Acid Labeling, under the module topic, Nucleic Acid Hybridization & Expression Analysis. This topic part has one section: Content Tutorial.
Content Tutorial
Detection Probes
*Note: Additional probe information is also provided in Nucleic Acid Sequencing.
DNA fragment probes
Probes can be made from any sequence of DNA. The only requirement is that it is complementary to the target. Fragments of known size and sequence can be isolated from agarose or acrylamide gels and purified, then labeled for use as a probe. Alternately, cloned fragments can be cut out from plasmids and purified from the rest of the plasmid also by gel electrophoresis. Once the probe is purified, labeling is performed (labeling will be discussed in a section below). dsDNA (double-stranded) probes made in any fashion need to be denatured just before use into single strands. This is usually done by boiling the probes just before use.
Probe synthesis
Special phage techniques can make ssDNA probes, or PCR can be used to amplify a region, and the amplicons used as probes. In synthesis reactions, the label is commonly incorporated during polymerizeation. RNA probes or “riboprobes” are prepared by transcribing (as compared to PCR – replicating) a double stranded DNA template that has been cloned into a vector. The labeled RNA probe is single stranded and will combine with either DNA or RNA. To bind mRNA, the antisense (opposite strand to mRNA) riboprobe must be prepared.
Oligonucleotide Probes
An oligonucleotide is a short fragment (10-100 nucleotides) of single stranded DNA prepared by a series of chemical reactions producing a known sequence of nucleotides.
For the oligonucleotide to be used as a probe, the specific nucleotide sequence must be known before synthesis begins. This information may be obtained directly from analysis of the target DNA or RNA. Less desirably, it is obtained indirectly from the amino acid sequence in the target protein. Each amino acid in a peptide chain is coded by a specific sequence of three nucleotide bases. Once the amino sequence in the protein is worked out, the corresponding nucleotide sequences can be determined.
Oligonucleotide probes are rapidly and inexpensively produced without the need for cloning vectors. The probes are exquisitely specific and a change of a single base pair in the patient sample may prevent binding. Hybridization reactions are faster than those using longer, less specific probes, but amplification may be needed to detect if reactions have taken place. Since the probes are smaller, there are less detection molecules in the test system. Test procedures for oligonucleotide probes will differ from those conventional probes and must be rigidly adhered to.
PNA Probes
Peptide Nucleic Acid probes is a nucleic acid analog with a peptide rather than sugar-phosphate backbone. Without a sugar-phosphate backbone, PNAs carry no charge, thereby exhibiting higher thermal stability (at least 1°C per base as compared to DNA/DNA hybrids) presumably due to the lack of charge repulsion within the duplex. This feature also greatly increases the rate of hybridization, some 50,000 times the rate of equivalent DNA probes. PNA/DNA duplexes also exhibit greater sensitivity to mismatches, a property that has facilitated the development of techniques to detect single base changes in DNA using PNA probes, thus PNA probes can be used as real-time PCR probes. Finally, PNA is not recognized by nucleases or proteases (yet another victim of the lack of electrostatic interactions) and hence is resistant to degradation by enzymes.
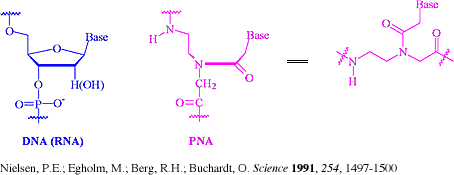
Because of the higher stability of the duplexes formed, smaller probes can be used (8-mers), which further increases the specificity. In addition, the greater efficiency of these molecules means that less probe can be used per experiment. PerSeptive (AP) Biosystems scientists have developed a technique that even takes a number of steps out of the Southern blotting and hybridization technique. By prehybridizing the DNA sample with fluorescent-PNA probes, hybrids that have been separated electrophoretically can be detected directly by fluorescence without any of the time-consuming blotting and hybridization steps. In addition, multiple probes can be run on the same gel, since the hybridization is conducted on the sample rather than on the gel. Even more astounding is the observation that PNA probes hybridize quantitatively in hybridization experiments in situ, an outcome virtually unheard of with this technique.[Excerpt from The Scientist 12[3]:17, Feb. 02, 1998] (www.the-scientist.com, HTML Page)
Signal Amplification
Branched DNA (bDNA technology)
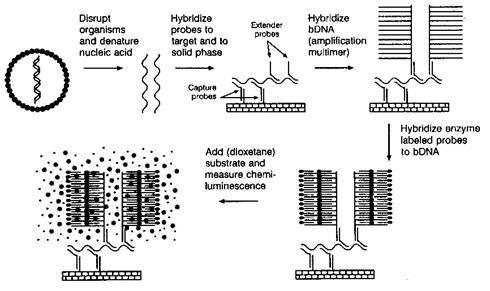
Recently, novel ways of constructing oligonucleotide probes have been developed. For example, branched probes combine several probe sequences into one complex. Target nucleic acid is captured to a solid surface via multiple contiguous capture probes. Extender probes hybridize with adjacent target sequences and contain additional sequences homologous to the branched amplification multimer. Enzyme-labeled oligonucleotides bind to the bDNA via homologous base pairing and the enzyme-probe complex is measured by detection of chemiluminescence (incorporates the emission of light with the emission of limited heat as the result of a chemical reaction taking place). All hybridization reactions occur simultaneously. More detection molecules are incorporated into the probe compared to the methods below, thus increasing the strength of
the reporter signal.
Ligand-Binding Probes
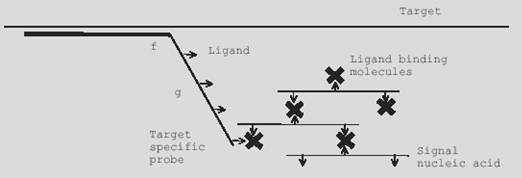
Probes are synthesized with biotin in at least 3 positions; at each end and in the middle. Streptavidin is used to cross link the probes, as one streptavidin molecule is able to bind 4 biotins, and labeled probes then used to detect the ligand-bound probes. More below.
Labeling the Probe
The probe must be labeled so it can be detected after hybridization has occurred under test conditions. If the DNA to be labeled as a probe is double stranded, it is heated to produce single stranded DNA. A variety of labeling systems are used.
Radioactive Isotopes
The traditional method of labeling dsDNA sequence probes has been to incorporate 32P into the phosphate portion of some of the nucleotides. This is accomplished by several types of reactions. Nick translation works by mixing the DNA, deoxyribonuclease (DNase), nucleotides containing 32P and DNA polymerase. The DNase breaks or nicks the DNA. New nucleotides containing 32P will be incorporated into the nicks by DNA polymerase. Alternately, end-labeling uses kinase enzyme to attach a 32P-labeled nucleotide to the 3’OH of the strands. Compared to nick translation, end labeling only incorporates one radioactive phosphate/probe. This is useful for Southern or northern blots where there is a good deal of target.
The inclusion of 32P in the nucleotides does not interfere with hybridization reactions. Sample DNA hybridized to the probe can be detected by using an overlay of X-ray film (autoradiography) or scintillation counters (radiation detection is triggered by a flash of light that permits the high-speed counting of particles and measurement of the energy of the radiation).
One of the main disadvantages of this method of labeling is the instability of the 32P. It has a half life of 14 days giving a very short shelf life to the probe. 32P is a high level β particle emitter, thus there are safety concerns to do with the handling and disposal of the radioactive material, but 32P-labeling remains the most inexpensive and sometimes the most sensitive labeling method. Many of the methods below have been combined with the amplification techniques described in module subset II-b and signal amplification above.
Biotin Streptavidin Labeling
Biotin is a water soluble vitamin that can be incorporated into the nucleic acid by using dUTP-biotin instead of the normal dTTP. This is accomplished without altering the ability of the bases to hybridize with complementary bases (dUTP bonds with dATP). After hybridization of the probe with sample nucleic acid, the probe is detected by adding streptavidin that has an enzyme such as horseradish peroxidase coupled to it. Streptavidin has an unusual affinity for biotin equal to that of covalent bonds and will combine with biotin containing probe bringing the peroxidase along with it. The next step in the procedure is to add a chromogenic substrate that changes color because of the action of peroxidase. The color change may be measured by standard procedures.
Solid Phase Labeling/Capture
When using probes to measure hybridization in membranes, the substrate must be one that becomes insoluble and sticks to the reaction site on the membrane for visualization. In-solution assays require the purification of the hybridized probe/target away from any unhybridized target. This can be accomplished by incorporating paramagnetic beads in the probe. A magnet can then be used to capture the hybridized complex. Alternately, one probe can be attached to a surface (a microtitre plate wall, a plastic bead), hybridization is performed and a second probe to a different region of the target is hybridized. This probe is labeled with a detection system label. In these assays, soluble color substrates such as those used in ELISA or chemiluminescent protocols can be used. Indeed, the technique for detection of hybridization using these techniques is very similar to an ELISA protocol. The ELISA (Enzyme-Linked Immunosorbant Assay) technique will be explored in detail in Module III, Protein Techniques.
Alkaline Phosphatase (AP)
Alkaline phosphate enzyme may be added to a probe with a 12-atom linker arm. Once the probe is hybridized, it is detected by color change in an appropriate substrate caused by the phosphatase enzyme. This is usually used with an oligonucleotide probe and tends to give fast results (one hour).
Antibodies
A highly antigenic compound, digoxigenin, can be attached to the guanine bases of a probe. Hybridized probe can then be detected by adding anti-Dig antibodies. The antibodies are coupled with a detection system such as horseradish peroxidase (HRP). The hybridized probe coupled with antigen, antibody and enzyme can then be detected by standard methods for the specific enzyme used. For example, a chemiluminescent assay can be performed to detect the HRP enzyme coupled to the anitibody.
Chemiluminescence
Probes may be labeled with a chemiluminescent acridinium ester. This label will not emit light after hydrolysis. When the probe hybridizes to the sample DNA or RNA, it is protected from hydrolysis. The test sample is added to the probe and after hybridization has taken place, a hydrolyzing agent is added.
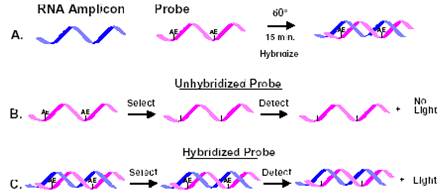
Ester that is not bound will hydrolyze and not emit light. The sample is placed in a luminometer and an increase in relative light units indicated hybridization of the probe. More commonly today, chemiluminescent substrates are used for detection of enzyme labeled probes, either AP or HRP. The major advantages to this technology is the rapid development of the signal (minutes versus hours or days for 32P), and signal strength equal to that of 32P. The substrates are moderately priced, but there are no safety concerns. Development of blots is done in a similar manner as autoradiography – expose the blot to X-ray film.
Fluorescence
Increasingly more common than all of the above labels is the fluorophores. There is an increasing number of colors available and detection methods. For direct detection of DNA without gel electrophoresis, Sybr Green is the most commonly used dye [for rtPCR, for example]. Ethidium bromide is the common one for gel electrophoresis. NOTE: Sybr green and EtBr are molecules that intercalate between the bases of DNA. They are thus known carcinogens and must be handled with gloves.
Cy3 (green) and Cy5 (red) are the most commonly used probe labels for DNA arrays, Southerns, or in-situ hybridization. For rtPCR, several other probe strategies use matched pairs of fluorophores where one excites the emission of the other if they are in close proximity, or pairs of fluorophore and quencher. If the quencher is removed, fluorescence increases. There will be increasing use of these probe types with rtPCR entering the clinical laboratory as multiple PCR reactions can be done in one tube and detection of specific genes by the probes shown by 4 or more colors of fluorescence. An example: Staphylococcus organisms seen in a blood culture bottle can be harvested, washed and lysed for rtPCR. The rtPCR reaction can confirm that it is Staphylococcus, identify it as S. aureus, determine if it is MRSA, and even tell if it is highly or intermediately resistant. This can all be done in as little as 2 hours – certainly of clinical impact.
Hybridization Protection Assays
Hybridization protection of a label was described above in the chemiluminescence section. This idea is also the basis behind an RNA assay for expression of cyokines, the communication molecules of the immune system. The sample RNA is hybridized to DNA probes. Each cytokine has its own probe and each is of a different length. Once the hybridization has completed, RNase A is added. RNase will digest ssRNA, but not the RNA in a DNA/RNA hybrid. The hybrid fragments are separated on an acrylamide gel and then detected by detection system appropriate for the label on the DNA probe.
Part b
Blotting Techniques
This is Part B, Blotting Techniques, under the module topic, Nucleic Acid Hybridization & Expression Analysis. This topic part has two sections: Content Tutorial and Animations.
Content Tutorial
Introduction to Blotting Techniques:
Blotting is the method of putting DNA, RNA or protein onto a membrane for further studies and detection. Usually prior to blotting the molecules are separated based on size or mass by electrophoresis (Module Subset II-a.). Like total protein electrophoresis, DNA and RNA can be separated by size/mass, but charge is irrelevant (DNA and RNA are negatively charged). In protein electrophoresis for molecular biology, proteins are separated by mass as charge is made negative by the pH of the buffer used. As there are no issues with charge, the only difference with the molecules position in the matrix following electrophoresis is the length of the sequence. Thus it is possible to determine the length of a piece of DNA or RNA or mass of a protein by its position in a gel relative to a standard marker. This type of analysis is important in epidemiology, forensics and in just checking up on your PCR reaction. For proteins many techniques are available to determine function as well as mass.
Two major types of matrix are used for electrophoresis; agarose gel or acrylamide gel. Agarose is of superior optical clarity compared to microbiology agar, but is handled in similar ways. Acrylamide is a crosslinked polymer that enables the use of small amounts of sample, separation of very similar pieces (sequencing gels for example) and are able to take a great deal of heat during the electrophoresis run. Buffers are added to the gels when they are made. DNA and RNA can be visualized in the gels after electrophoresis by the addition of a fluorescent dye that can be seen under UV light. Usually pictures or digital images are used for determination of the size of the bands in the gel.
Blotting
The first blotting technique described was the Southern blot; published in 1975 by E. M. Southern. He described a technique for detecting specific DNA fragments after electrophoresis so a specific gene could be isolated from a complex DNA mixture. Since then, electrophoresis/blotting has been done with RNA (northern blots) and proteins (western blots). There has been lots of speculation on how you would run an eastern, but no one has solved it to date. [Note that the only technique that earns a capital initial is Southern!] Blots done without electrophoresis are called dot assays or dot blots or slot blots if a linear slot was used – often with filter paper migration of the target towards the probe. All blotting assays can be qualitative or quantitative depending on the fine details of the protocol. Detection of the DNA and RNA bands on the membrane is accomplished by the incorporation of some type of label in a specific probe. Probes will be described below. Western blots and protein dot blots are detected using specific antibodies, antibody conjugates and substrates. Western blots differ from DNA/RNA blots in that electrophoresis is used to accomplish the transfer of the proteins from the acrylamide gel to the membrane. Western blotting will be explored in detail in Module III, Protein Techniques.
In Southern/northern blotting, the DNA fragments/RNA molecules are separated according to size by gel electrophoresis in agarose gel. The technique is identical for RNA from DNA except for the reagents used and the sampling precautions of working with RNA (Module 2). Northern gels contain formamide – a potent inhibitor of RNases, so your sample is safe once it is in the gel. The next step in the Southern/northern blot technique is to transfer the bands of DNA to an inert membrane. When the membrane is being prepared for testing with a DNA probe, the DNA must be denatured to single stranded DNA before being fixed to the membrane. This may be accomplished by soaking the gel in sodium hydroxide or denaturing the DNA after it is blotted on the inert membrane.
Nitrocellulose or positively-charged nylon filters are used for blotting. The agarose gel is placed between several sheets of filter paper soaked in buffer, the nitrocellulose filter sits on top of this and paper towels sit on top of the nitrocellulose. As the buffer is drawn thought the agarose gel, it carries the DNA to the nitrocellulose or nylon filter, where it sticks. The blotting procedure may be accelerated by transmitting a vacuum through the gel and filter paper (vacuum blotting). Once the DNA is transferred to the filter, the DNA is permanently fixed the membrane if 1) it is the right kind of charged membrane, 2) the filter is heated several hours in a vacuum oven or seconds in a microwave, or 3) crosslinked by UV light (special UV linkers or your gel transilluminator).
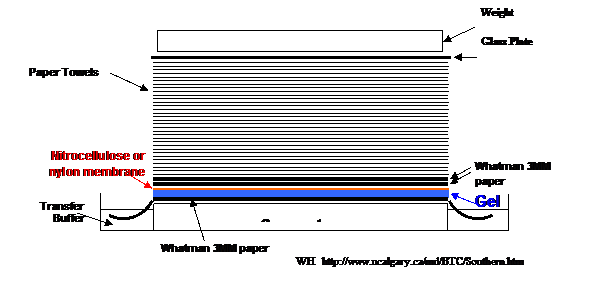
The filter is then bathed with a solution containing first a blocking agent to prevent non-specific attachment of the detection probe to the membrane (pre-hyb), then the probe (hyb mix). The probe will hybridize to complementary DNA while any unbound probe will be washed off. Hybridization and detection of bound probe is described in much more detail in the sections below. In general, this is how a blotting protocol works.

University of Calgary Biotechnology Training Centre
Animations
Cold Spring Harbor Laboratory – Dolan DNA Learning Center
1. Southern Blotting Technique Click on the following link to view an animation of the Southern Blotting technique relating to the information described and illustrations shown in the above materials.
- Southern Blotting technique (www.ddnalc.org, Multimedia Page)
2. Southern Blot: Animation from Raven, Johnson, Losos, & Singer, Biology, 7th Edition, 2005 View the following narrated animation to see a simulated overview about the laboratory steps involved in conducting a Southern blot. When you click on the link below you will be taken to a list of molecular biology Animations.
- Biology Animations (highered.mcgraw-hill.com, Multimedia Page)
View the narrated animation titled “Southern Blot”.
Part c
In Situ Hybridization & DNA Microarrays
This is Part C, In Situ Hybridization & DNA Microarrays, under the module topic, Nucleic Acid Hybridization & Expression Analysis. This topic part has two sections: Content Tutorialand Animations.
Content Tutorial
As an introduction to Nucleic Acid Hybridization, click on the following link to view a tutorial developed by the Howard Hughes Medical Institute on gene expression. “To understand what a gene does, particularly its role in an organism’s development, it is useful to know where and when it is turned on.” (HHMI BioInteractive, 7/7/06)
- HHMI,Visualizing Gene Expression (www.hhmi.org, Multimedia Page)
Howard Hughes Medical Institute
Nucleic Acid Hybridization/Annealing and Stringency
Hybridization or annealing is based on the ability of a single-stranded nucleic acid sequence (either DNA or RNA) to specifically bind (hybridize/anneal) to its/a complementary strand. If dsDNA is denatured or melted, it will hybridize when the denaturant or heat is removed. A few bases start the process and the rest of a matching sequence will hybridize much like a zipper closing. Hybridization in molecular methods uses single-stranded nucleic acid probes (either DNA or RNA) or oligonucleotides of defined sequence to hybridize to a target DNA or RNA of interest. Complementarity between the two strands is determined by the formation of specific hydrogen bonds between nucleotide bases of the probe/primer and target nucleic acid, such that only the base pairs adenine-thymine, adenine-uracil, and guanine-cytosine form hydrogen bonds, giving sequence specificity to the double stranded duplex.
The degree of binding and specificity of the binding depends on a number of factors that control the strength of the hydrogen bonds between complementary nucleotide bases: temperature, pH, use of a denaturant such as formamide, salt concentration of buffer solutions. A certain number of mismatched base pairs can be tolerated in DNA hybridization. For example, the base adenine lining up opposite to guanine would be a mismatch. As long as a significant number of base pairs do match and form bonds, the strands will hybridize. The degree of mismatching tolerated in a hybridization reaction is called “stringency”. Under conditions of high stringency (for example: high temperature), only exact matches of bases will anneal and stay together. Under conditions of low stringency (low temperature), strands that are only 80 – 90% homologous will bind and give a positive hybridization signal or be able to prime replication. Short probes and primers require more precise test conditions than do longer probes to give an acceptable level of stringency.
Another concept that goes with annealing is melting temperature. Recall from the Introduction Module I, that GC bp have 3 hydrogen bonds and AT bp have two. The more bonds, the higher the amount of heat required to disrupt them. In long pieces of DNA, temperatures >93°C are required and the more GC bonds present, the higher the temperature. For shorter oligonucleotide pieces like primers and some probes, lower temperatures are required to melt the primer or probe from the target. The melting temperature is determined by the GC and AT content of the primer/probe. To achieve stringency in the amplification techniques described below (esp. PCR and LCR), the annealing temperature of the primers/probes is usually 5°C less than the melting temperature. This should maintain high stringency in the reaction, ensuring that only the desired target is amplified.
Nucleic Acid Hybridization
As mentioned above, hybridization methods are based on the ability of a single-stranded nucleic acid probe (either DNA or RNA) of defined sequence to specifically bind (hybridize) to the target DNA or RNA of interest. The probe can be labeled with enzymes, chemiluminscent, radioisotopic, magnetic particles or fluorescent moieties that can be readily detected or captured by automated instruments. Briefly, after extraction of the DNA of interest from the clinical specimen or growing cultures, the DNA is then denatured (e.g. the two strands of the DNA molecule are separated using heat or alkali treatment). Since RNA is single-stranded, no denaturation is necessary if RNA is the target nucleic acid. A labeled single-stranded probe unique to the target being sought is added and hybridizes to one of the DNA strands of the specimen if it has a complementary sequence (i.e.: if the pathogen is present). After unbound probe is removed, bound probe can then be detected using one of the methods described above. Hybridization methods are currently in use for the detection and identification of pathogens directly from clinical specimens (e.g. Chlamydia trachomatis, Neisseria gonorrhoeae) or from growing cultures (e.g. Mycobacterium tuberculosis). Hybridization of PCR products to probes or vice versa can be used for HLA typing. A schematic diagram of hybridization of an RNA probe to a DNA target is shown below.
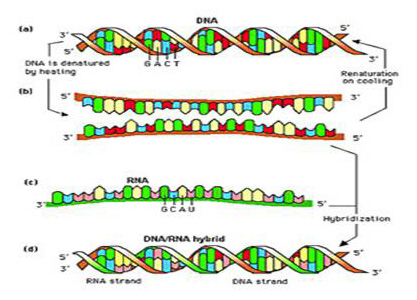
Once double stranded DNA is denatured to single stranded DNA, it is capable of binding or reassociating with complementary single stranded DNA or RNA. Once a probe is prepared, it must be brought into contact with sample nucleic acid to allow hybridization to take place.
Protocol Notes:
A prehybridization step is required before hybridization to block non-specific sites, since you don’t want your single-stranded probe binding just anywhere on the membrane. To prehybridize, add non-specific ssDNA. Somicated salmon sperm DNA is commonly used as most people are not working with salmon. To hybridize, use the same buffer as for prehybridization, but add your specific probe.
After hybridization (a few hours to overnight), the blot needs to be washed to remove any unbound probe. SSC, a high salt buffer, is used at a temperature close to the temperature at which the probe will melt from the target (generally 5°C less). Washes start with low temp and high salt and gradually increase in temperature and decrease in salt until the desired stringency is achieved. Visualization of probe binding is described below.
In situ Hybridization
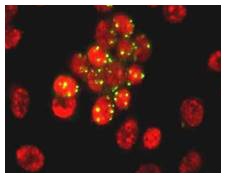 In situ hybridization brings a DNA or RNA probe into contact with the target DNA or mRNA in the tissue or cell under investigation. The technique finds use in histotechnology where tissue sections are probed for the presence of an infectious agent, often viral. It is also used to locate specific genes responsible for an abnormality or specific RNA for expression in certain tissues at certain times. Finally, this is the premise of FISH, or fluorescence in-situ hybridization, now used in cytogenetics. HPV–In Situ with FITC label.
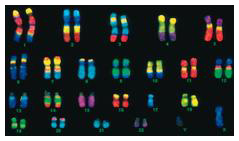 The fixation and preparation of the tissue must preserve nucleic acid and the probe must have access to nucleic acid during the hybridization period. Formalin-fixed parafin-embedded tissues may be used for hybridization reactions. The tissue is fixed to the slide and the parafin removed by usual means. A digestion process with hydrochloric acid or protenase is necessary to remove histones and other proteins that may mask nucleic acid. The section is subjected to heat, about 85˚C for 10 minutes, to denature the nucleic acid to single strands. A solution containing the probe is added and the preparation allowed to sit overnight for hybridization to take place. Nonhydridized probe is removed by washing the slide in buffers.
Enzyme-labeled probes are common for this technique using the biotin-avidin horseradish peroxidase label or the alkaline phosphatase label. The appropriate chromogenic substrate is added to the preparation and labeled probe is located in tissue under microscopic examination. Fluorescent labeled probes are also extremely common, and only require a fluorescent microscope for detection. Digital images are taken in each color and then the images are combined.
DNA Microarray Assays
DNA arrays are the newest way to analyze a lot of samples (spotted on the support) with one probe or a lot of probes (spotted) with one sample. Either strategy is presently in use for HLA typing. Recent literature hints at some great arrays coming to determine not just a bacteria’s genus and species, but complement of pathogenic genes – able to answer if is it EHEC, EPEC or ETEC or something new? 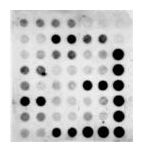 Or, how about arrays to all the pathogens that may be in a particular specimen?Replicate samples can be done on the same array – often up to 4 replicates/hybridization! Samples or probes are attached to membranes or glass slides, then hybridized accordingly. DNA arrays are hybridized exactly as dot blots if the array is on a membrane and as an in-situ if the array is on glass. Special software has been created to analyze the huge number of data points.
 Two color arrays are used to determine changes in the expression of genes. cDNA is made from normal and test cells/tissue and hybridized to genomic arrays. The relative increase and decrease in expressed genes can be determined. This technology may remain the domain of research for some time, but clinical applications include rapid analysis of expression of genes in tumors, in inflammation, and many other diseases.
To understand the principles behind cDNA expression arrays, there is a wonderful animation available written by Dr. Malcom Campbell (see Animations below). The array used in the example compares genes that are turned on in yeast under aerobic versus anaerobic conditions. The array above, from that site, has cDNA probes on the array to every gene in the yeast genome. cDNA, if you remember from the RT-PCR section (module subset II-b) is the complement for mRNA, and thus mRNA will hybridize with it.
Anatomy of a Comparative Gene Expression Study- Washington University in St. Louis
The following website provides a descriptive content tutorial of a step-by-step protocol for conducting a comparative gene expression study by using molecular techniques to carry out the hybridization experiment. The step-by-step tutorial is a nice follow-up to the University of Calgary information provided above because the content discussed previously is now being applied to specific steps in an ordered protocol that would be carried out in a real-life laboratory setting. The study is broken down into six main components listed below:
Comparative Gene Expression Study (www.cs.wustl.edu, Multimedia Page)
- Choosing Cell Populations
- mRNA Extraction and Reverse Transcription
- Fluorescent Labeling of cDNA’s
- Hybridization to a DNA Microarray
- Scanning the Hybridized Array
- Interpreting the Scanned Image
University of Calgary Biotechnology Training Centre
Animations
1. Large Scale Analysis Cold Spring Harbor Laboratory, Dolan DNA Learning Center, DNA Interactive. Follow the link below to the DNA Interactive Website.
- DNA Interactive Website (www.dnai.org, Multimedia Page)
Click on “Manipulation” and then click on the “Techniques” module. Next, click on the “Large-scale analysis” section where you will be able to view the three animations provided. In the first animation, GeneChips (2D), you will learn about the development of the first DNA chip and how it became the basis of techniques for large-scale genomic studies. In the second animation, Making GeneChips, you will view real images and learn about Affymetrix, the makers of GeneChip array technology. In the third animation, DNA arrays (2D), you will learn about DNA arrays and how they allow scientists to analyze patterns of gene expression.
When you have finished viewing the animations, watch the video Interviews that are provided on the webpage.The Interview titles are listed below:
- Developing GeneChips
- Elegant Combinations
- GeneChips, step by step
- Why microarrays?
- Making a microarray
- What’s on a microarray?
2. DNA Microarray Methodology Flash Animation Davidson University View the animation provided by accessing the link below to better understand the principles behind cDNA expression arrays.
- DNA Microarray Methodology Flash Animation (www.biodavidson.edu, Multimedia Page)
The animation was written by Dr. Malcom Campbell (www.bio.davidson.edu, HTML Page), and the array used in the example compares genes that are turned on in yeast under aerobic versus anaerobic conditions. The array above, from that site, has cDNA probes on the array to every gene in the yeast genome. Remember from module subset II-b. in the RT-PCR section, that cDNA is the complement for mRNA, and thus mRNA will hybridize with it.
3. Analyzing Microarray Data Howard Hughes Medical Institute, Biointeractive
a. Click on the Howard Hughes Medical Institute’s Biointeractive website link provided below to view a tutorial developed by the Howard Hughes Medical Institute on analyzing microarray data. The tutorial provides an overview of how a microarray experiment is conducted, how microarrays are used to study gene expression, and how large amounts of expression data can be analyzed.
- Biointeractive website (www.hhmi.org, Multimedia Page)
b. Click on this next HHMI animation to learn about Gene Chip Manufacturing and Small-Molecule Arrays by watching the brief video provided.
- Gene Chip Manufacturing (www.hhmi.org, Multimedia Page)
4. Microarray: Animation from Raven, Johnson, Losos, & Singer, Biology, 7th Edition, 2005 View the following narrated animation to see a simulated overview about the laboratory steps involved in synthesizing a DNA microarray and analyzing microarray data. When you click on the link below you will be taken to a list of molecular biology Animations. View the narrated animation titled “Microarray”.
- Microarray (highered.mcgraw-hill.com, Multimedia Page)
5. DNA Microarray Flash Animation: Additional Practice Science Launcher The following link provides an additional flash animation depicting a DNA Microarray experiment.
- DNA Microarray experiment (www.sciencelauncher.com, Multimedia Page)
Activities
VIRTUAL LAB
DNA Microarray Virtual Lab “DNA microarray analysis is one of the fastest-growing new technologies in the field of genetic research. Scientists are using DNA microarrays to investigate everything from cancer to pest control.” (Genetic Science Learning Center, University of Utah) Task: Complete the DNA Microarray Virtual Lab. In the virtual lab you will conduct a microarray experiement in which you will use a DNA microarray to investigate the differences between a healthy cell and a cancer cell. “The Virtual Lab is broken up into three chapters. Chapters One and Two will give you some background and review a couple of important principles that are essential to the understanding of DNA Microarrays. Chapter Three is the actual experiment. Before you head into the lab, it is highly recommended that you take a look at Chapter One – Genomics: a New Science and Chapter Two – Measuring Gene Expression.
- Virtual Lab (learn.genetics.utah.edu, Multimedia Page)
In Chapter Three you will carry out the experiment. The experiment is divided into seven steps:
- Isolate RNA
- Isolate mRNA
- Make Labeled DNA Copy
- Apply DNA
- Scan Microarray
- Analyze Data
Task: Upon completion of the virtual lab, explain in detail specifically why DNA microarray analysis is a powerful tool in genomics. In addition, while DNA microarray is an extremely useful molecular biology technique that can generate significant amounts of data it does have some limitations. Identify and briefly explain some of the limitations to DNA microarray analysis.